페이스북 자바스크립트 SDK를 이용하여 자신의 웹페이지에서 페이스북 계정으로 로그인 하기
자신의 홈페이지에서 페북계정으로 로그인 하는걸 이번 시간에 해볼게요. ^-^
시작 전에
페이스북 자바스크립트 SDK 퀵가이드를 읽어 보시기 바랍니다.
영어로 되어 있지만 번역기등을 사용하시거나 번역 하셔서 한번 읽어 보면 그래도 많은 도움이 될것 입니다. 저는 다 번역 하느라 번역 하는데만 시간이 엄청 걸렸네요. ^^;
페이스북 앱 생성하기
페이스북 API를 활용하기 위해서는 페이스북 앱을 만들어야 합니다.
이러한 앱은 여러가지 플랫폼에서 활용하기 위해 꼭 만들어야 하는데요.
여러가지 플랫폼이란 안드로이드, iOS, XBOX, 웹 등을 뜻합니다.
그럼 우선 앱 만들어 봅시다. 스마트폰에서 운용하는 그 앱이 아닙니다. 페이스북의 앱이 라고 따로 있습니다.
이곳에 접속하면 아래의 화면이 보입니다.
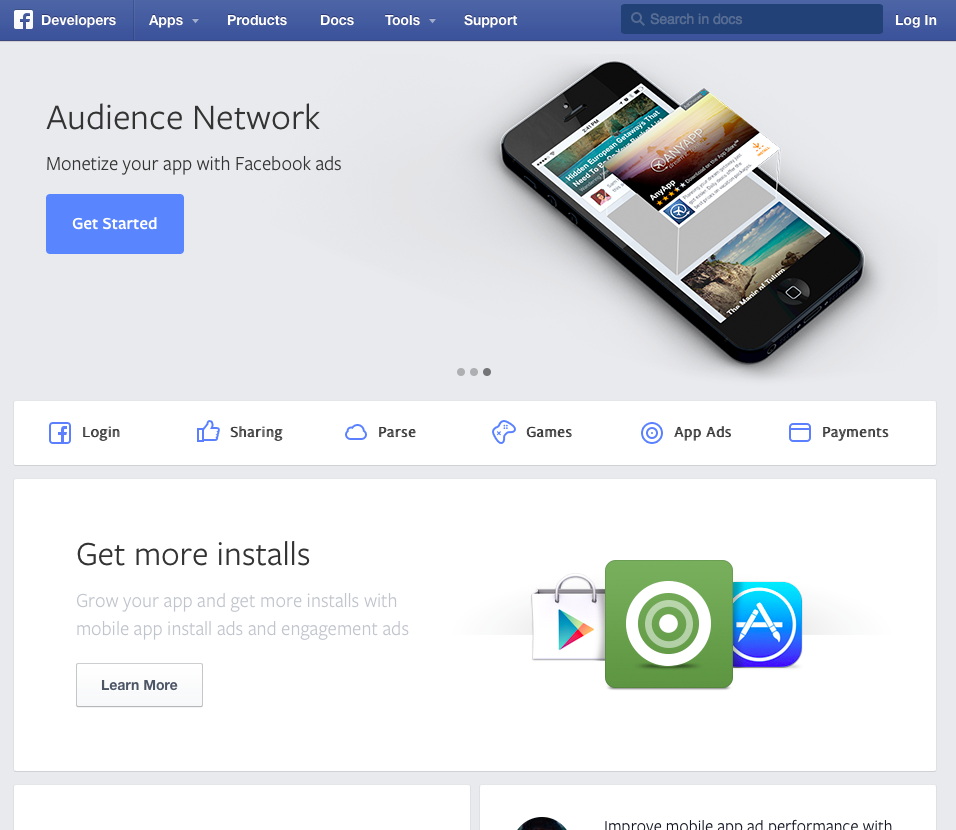
로그인을 하시고 메뉴에서 apps를 누르면 아래의 화면이 나옵니다. Create a New App을 누릅니다.
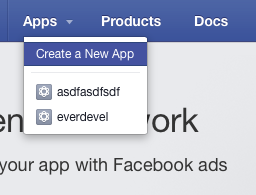
Create a New App을 누르면 아래의 화면이 보입니다.
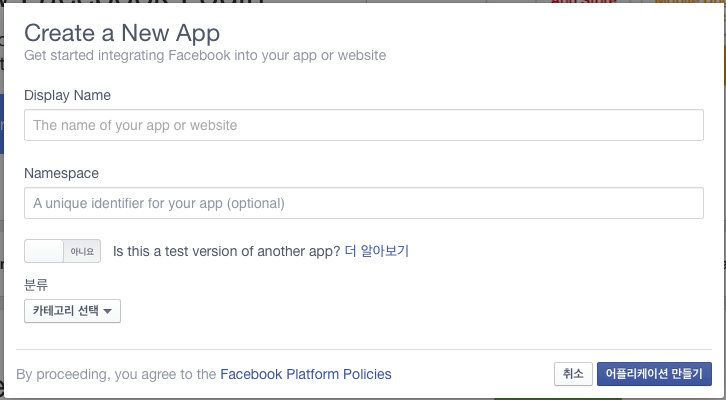
Display Name는 당신의 앱의 이름을 지정하는것입니다. 당신이 하고 싶은 이름을 입력하시면 됩니다.
NameSpace 는 옵션이므로 작성을 하지않아도 괜찮습니다.
분류는 자신의 앱의 성격에 맞는걸 고르시면 됩니다. 그리고 애플리케이션 만들기를 눌러 줍니다.
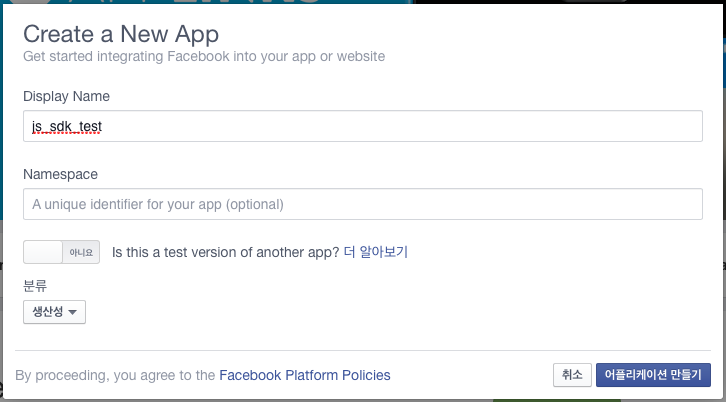
애플리케이션 만들기 버튼을 누르면 그림에 보이는 문자를 입력해 달라는 창이 뜨며 입력 완료하면 아래와 같이
앱 셋팅 페이지가 표시 됩니다.
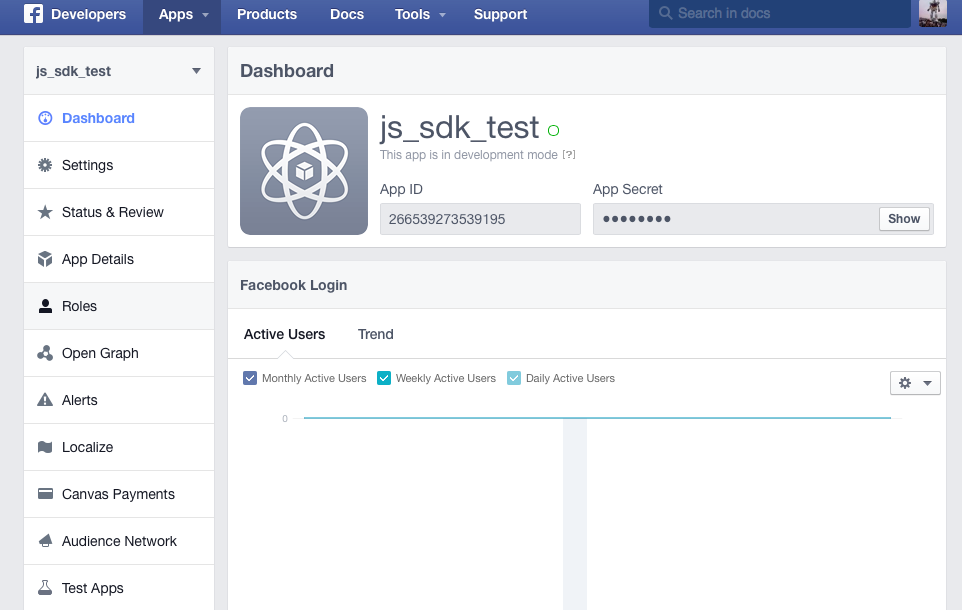
왼쪽에 보이는 Settings 를 누르면 아래와 같은 화면이 출력 됩니다.
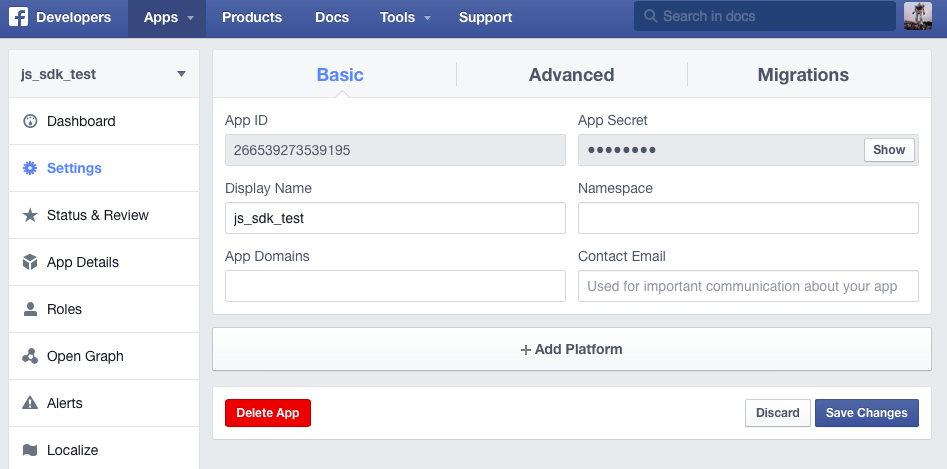
위의 이미지에서 하단에 위치한 +Add Platform 버튼을 누르면 아래의 화면이 보입니다. 2번째에 위치한 Website를 클릭합니다.
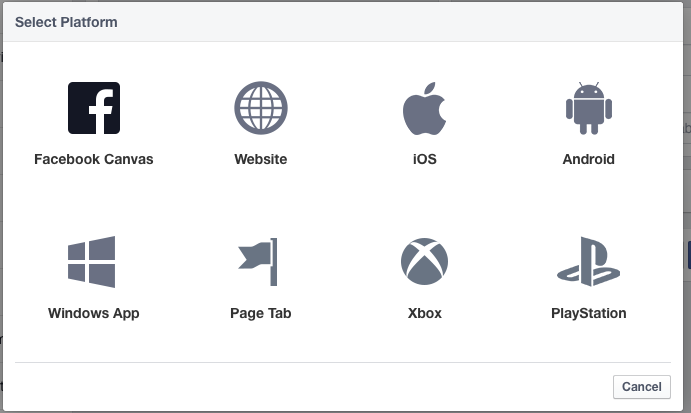
Website를 눌렀더니 셋팅 화면에 아래와 같이 웹사이트 항목이 추가 되었습니다. 이곳에서 당신이 작업할 웹페이지 URL을 입력 하시기 바랍니다.
보통 자신의 도메인을 갖고 있지 않은 경우가 많으므로 저는 로컬에서 작업을 하려고 합니다.
자기 자신이 도메인을 가지고 있지 않다면 저랑 똑같이 작업해 주시고 자신의 웹사이트에서 작업을 하시려면 자신의 URL을 입력 하시기 바랍니다.
저는 로컬에서 작업하므로 URL 란에 http://localhost/fb_js_sdk/index.php 를 입력 했습니다. 여러분도 똑같이 해주세요.

그리고 하단에 Save Changes 버튼을 클릭 합니다.
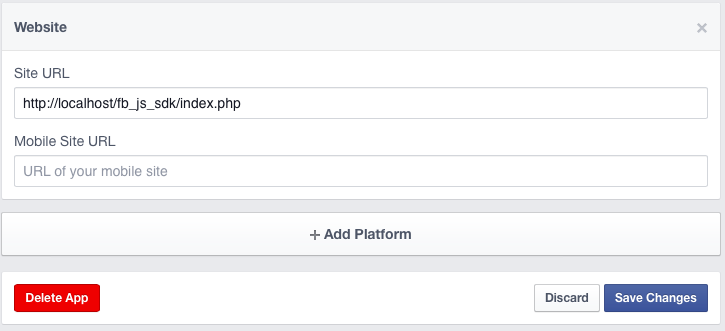
위와 같이 웹사이트 항목이 추가 되었습니다.
자 이제, 그럼 천천히 설명을 해보겠습니다. 페이스북 자바스크립트 SDK는 어떠한 파일을 웹서버에 업로드 하는것이 아니라 소스를 해당하는 페이지에 입력 해야 합니다.
코딩해야 하는 소스는 기본적으로 아래의 소스 입니다.
<!DOCTYPE html>
<html>
<head>
<title>Facebook Login JavaScript Example</title>
<meta charset="UTF-8">
</head>
<body>
<script>
// This is called with the results from from FB.getLoginStatus().
function statusChangeCallback(response) {
console.log('statusChangeCallback');
console.log(response);
// The response object is returned with a status field that lets the
// app know the current login status of the person.
// Full docs on the response object can be found in the documentation
// for FB.getLoginStatus().
if (response.status === 'connected') {
// Logged into your app and Facebook.
testAPI();
} else if (response.status === 'not_authorized') {
// The person is logged into Facebook, but not your app.
document.getElementById('status').innerHTML = 'Please log ' +
'into this app.';
} else {
// The person is not logged into Facebook, so we're not sure if
// they are logged into this app or not.
document.getElementById('status').innerHTML = 'Please log ' +
'into Facebook.';
}
}
// This function is called when someone finishes with the Login
// Button. See the onlogin handler attached to it in the sample
// code below.
function checkLoginState() {
FB.getLoginStatus(function(response) {
statusChangeCallback(response);
});
}
window.fbAsyncInit = function() {
FB.init({
appId : '{your-app-id}',
cookie : true, // enable cookies to allow the server to access
// the session
xfbml : true, // parse social plugins on this page
version : 'v2.0' // use version 2.0
});
// Now that we've initialized the JavaScript SDK, we call
// FB.getLoginStatus(). This function gets the state of the
// person visiting this page and can return one of three states to
// the callback you provide. They can be:
//
// 1. Logged into your app ('connected')
// 2. Logged into Facebook, but not your app ('not_authorized')
// 3. Not logged into Facebook and can't tell if they are logged into
// your app or not.
//
// These three cases are handled in the callback function.
FB.getLoginStatus(function(response) {
statusChangeCallback(response);
});
};
// Load the SDK asynchronously
(function(d, s, id) {
var js, fjs = d.getElementsByTagName(s)[0];
if (d.getElementById(id)) return;
js = d.createElement(s); js.id = id;
js.src = "//connect.facebook.net/en_US/sdk.js";
fjs.parentNode.insertBefore(js, fjs);
}(document, 'script', 'facebook-jssdk'));
// Here we run a very simple test of the Graph API after login is
// successful. See statusChangeCallback() for when this call is made.
function testAPI() {
console.log('Welcome! Fetching your information.... ');
FB.api('/me', function(response) {
console.log('Successful login for: ' + response.name);
document.getElementById('status').innerHTML =
'Thanks for logging in, ' + response.name + '!';
});
}
</script>
<!--
Below we include the Login Button social plugin. This button uses
the JavaScript SDK to present a graphical Login button that triggers
the FB.login() function when clicked.
-->
<fb:login-button scope="public_profile,email" onlogin="checkLoginState();">
</fb:login-button>
<div id="status">
</div>
</body>
</html>
중간에 보면 appId : '{your-app-id}', 가 보입니다. 그곳에 당신의 앱 아이디를 넣습니다. 우리가 앱을 만들때 셋팅 화면에서 봤던 그 앱 아이디 입니다.
못찾으시면 컨트롤 에프 해서 찾아 봅시다.
{your-app-id} 이 부분을 싹 지우시고 앱 아이디를 넣습니다.
이제 저처럼 로컬에서 작업하시는 분은 APMSETUP 또는 MAMP 등 웹서버를 구동 합니다.
혹시 웹서버 구동 모르시는 분은 개발 환경 구축 페이지를 보시면 됩니다.
일단 이 소스를 그대로 복사 붙여 넣기 해서 htdocs폴더안에 fb_ever폴더를 만든후 index.php파일로 저장을 합니다.
소스 흐름도 파악 하기
작업 전에 한번 이 소스가 어떤 흐름으로 구동이 되는지 봐볼까요^^
사실 저도 잘 몰라서 여러분께서 만족할만한 설명은 하지 못 합니다. 여러분들도 이렇게 설명할 거면 나도 할 수 있다 정도 일겁니다. ㅋ
위 소스의 하단에 위치한 아래 소�스는 페이스북 로그인 버튼을 보여 줍니다.
<fb:login-button scope="public_profile,email" onlogin="checkLoginState();">
</fb:login-button>
즉, 클릭을 하면 checkLoginState() 함수가 작동하게 됩니다.
function checkLoginState() {
FB.getLoginStatus(function(response) {
statusChangeCallback(response);
});
}
위의 소스를 보면 또 하나의 함수를 호출 하고 있죠? 그 함수가 statusChangeCallback()가 이며 response를 파라미터로 보냅니다.
function statusChangeCallback(response) {
console.log('statusChangeCallback');
console.log(response);
// The response object is returned with a status field that lets the
// app know the current login status of the person.
// Full docs on the response object can be found in the documentation
// for FB.getLoginStatus().
if (response.status === 'connected') {
// Logged into your app and Facebook.
testAPI();
} else if (response.status === 'not_authorized') {
// The person is logged into Facebook, but not your app.
document.getElementById('status').innerHTML = 'Please log ' +
'into this app.';
} else {
// The person is not logged into Facebook, so we're not sure if
// they are logged into this app or not.
document.getElementById('status').innerHTML = 'Please log ' +
'into Facebook.';
}
}
위의 소스는 로그인 정보를 판별 하게 됩니다. reponse.status로 3가지 상태를 분류하고 있네요
3가지는,
1. connected
2. not_authorized
3. unknown
connected 는 페이스북에도 로그인을 했고 앱에도 로그인에 했을때 이며,
not_authorized는 페이스북에는 로그인을 했으나 앱에는 로그인을 하지 않은 상태 입니다.
unknown는 랩에도 로그인 하지 않았고 페이스북에도 로그인을 하지 않은 경우 입니다.
소스에서 보면 connected인 상태를 보면 testAPI()라는 함수를 호출 하네요. 즉, 로그인에 성공하고 앱 로그인도 성공하면 testAPI()를 실행 한다는 것이지요.
그리고 그렇지 않은 경우는
document.getElementById('status').innerHTML = 'Please log ' +
'into this app.';
위의 명령문을 실행 합니다. 즉 status라는 ID값에 please log 블라 블라 를 넣는 것이지요.
그럼 이번엔 testAPI() 함수를 볼까요.
function testAPI() {
console.log('Welcome! Fetching your information.... ');
FB.api('/me', function(response) {
console.log('Successful login for: ' + response.name);
document.getElementById('status').innerHTML =
'Thanks for logging in, ' + response.name + '!';
});
}
콘솔로그 실행하고 로그인을 성공했다는 메세지를 출력 하고 있네요. reponse.name
reponse.name
이것은 사용자의 이름을 가져온것 입니다. reponse.name로 사용자의 이름을 가져오니 다른 정보도 가져올수 있다는게 유추 가능한 부분입니다.
그러면 우리가 실제 이 소스를 구동 해볼까요^^
위에서 말한대로 htdocs폴더안에 fb_ever 폴더를 생성 후에 index.php 파일에 위의 소스를 저장해주세요.
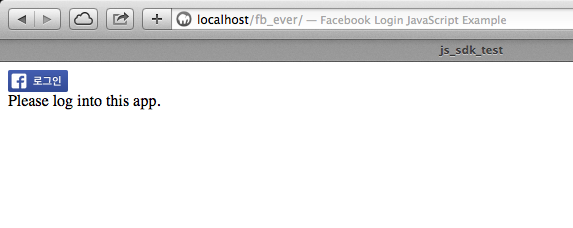
아래와 같은 화면이 나오는걸 볼 수 있습니다. 로그인 버튼을 누르고 로그인 하시면
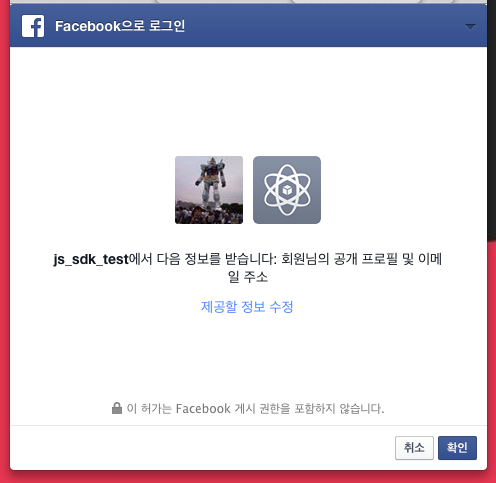
아래와 같이 앱이 사용자의 정보에 접근 할것인지 물어 봅니다.
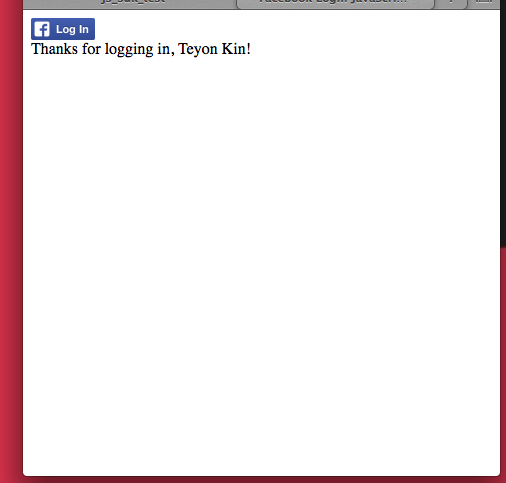
그리고 확인을 눌러주면 다음과 같이 로그인 성공 화면이 나옵니다. ^^
그럼 로그인을 했는데 로그아웃은 어떻게 해야 할까요?
로그아웃
여기를 눌러서 한번 개발 문서를 봐보죠.
위의 문서를 보면 자바스크립트의 레퍼런스들이 보입니다. 페이스북 로그인 메소드를 보면 로그인도 있고 로그아웃도 있고
로그아웃 함수를 클릭 해보면 문서들 중에 아래와 같은 소스가 있습니다.
FB.logout(function(response) {
// user is now logged out
});
위의 소스는 페이스북 로그인을 해주는 함수 인데요. 작동을 시키기 위하여
특정 함수로 감싸봅시다. fb_logout()라는 함수로 감싸 봅시다.
function fb_logout(){
FB.logout(function(response) {
// user is now logged out
});
}
위의 소스를 index.php 파일 안의 스크립트 태그 안에 넣어 주세요.
그리고 아래의 소스를 index.php파일의 로그인 버튼 아래에 넣어 주세요.
<p onclick="fb_logout()">Logout</p>
그러면 아래의 소스와 같이 되겠죠?
<!DOCTYPE html>
<html>
<head>
<title>Facebook Login JavaScript Example</title>
<meta charset="UTF-8">
</head>
<body>
<script>
// This is called with the results from from FB.getLoginStatus().
function statusChangeCallback(response) {
console.log('statusChangeCallback');
console.log(response);
// The response object is returned with a status field that lets the
// app know the current login status of the person.
// Full docs on the response object can be found in the documentation
// for FB.getLoginStatus().
if (response.status === 'connected') {
// Logged into your app and Facebook.
testAPI();
} else if (response.status === 'not_authorized') {
// The person is logged into Facebook, but not your app.
document.getElementById('status').innerHTML = 'Please log ' +
'into this app.';
} else {
// The person is not logged into Facebook, so we're not sure if
// they are logged into this app or not.
document.getElementById('status').innerHTML = 'Please log ' +
'into Facebook.';
}
}
// This function is called when someone finishes with the Login
// Button. See the onlogin handler attached to it in the sample
// code below.
function checkLoginState() {
FB.getLoginStatus(function(response) {
statusChangeCallback(response);
});
}
window.fbAsyncInit = function() {
FB.init({
appId : '{your-app-id}',
cookie : true, // enable cookies to allow the server to access
// the session
xfbml : true, // parse social plugins on this page
version : 'v2.0' // use version 2.0
});
// Now that we've initialized the JavaScript SDK, we call
// FB.getLoginStatus(). This function gets the state of the
// person visiting this page and can return one of three states to
// the callback you provide. They can be:
//
// 1. Logged into your app ('connected')
// 2. Logged into Facebook, but not your app ('not_authorized')
// 3. Not logged into Facebook and can't tell if they are logged into
// your app or not.
//
// These three cases are handled in the callback function.
FB.getLoginStatus(function(response) {
statusChangeCallback(response);
});
};
// Load the SDK asynchronously
(function(d, s, id) {
var js, fjs = d.getElementsByTagName(s)[0];
if (d.getElementById(id)) return;
js = d.createElement(s); js.id = id;
js.src = "//connect.facebook.net/en_US/sdk.js";
fjs.parentNode.insertBefore(js, fjs);
}(document, 'script', 'facebook-jssdk'));
// Here we run a very simple test of the Graph API after login is
// successful. See statusChangeCallback() for when this call is made.
function testAPI() {
console.log('Welcome! Fetching your information.... ');
FB.api('/me', function(response) {
console.log('Successful login for: ' + response.name);
document.getElementById('status').innerHTML =
'Thanks for logging in, ' + response.name + '!';
});
}
function fb_logout(){
FB.logout(function(response) {
// user is now logged out
});
}
</script>
<!--
Below we include the Login Button social plugin. This button uses
the JavaScript SDK to present a graphical Login button that triggers
the FB.login() function when clicked.
-->
<fb:login-button scope="public_profile,email" onlogin="checkLoginState();">
</fb:login-button>
<p onclick="fb_logout()">Logout</p>
<div id="status">
</div>
</body>
</html>
그리고 위의 소스를 실행 시키면 로그아웃을 눌렀을때 로그아웃 함수가 작동합니다.
지금은 로그인을 해도 로그인 버튼이 보이거나 합니다. 또 로그아웃 해도 로그아웃 했다고 말해주지도 않죠.
좀 더 소스를 에디팅 한다면 가능 합니다. 혹시 이부분에 대하여 문의점이 있으면 구글링 해보시고 그래도 못찾겠다면, 에버디벨이 문의 남겨 주시기 바랍니다. ^^
봐주셔서 감사합니다. 문의 또는 잘못된 설명은 아래의 댓글에 부탁드립니다.
당신의 작은 누름이 저에게는 큰 희망이 됩니다.
